Strung across the hills above the Going-to-the-Sun Road, the Glacier Highline Trail offers incredible and sweeping views of Glacier National Park. Hugging the side of the hills, the point to point trail passes over steep drops before reaching the the Granite Park Chalet. Just before reaching the chalet there is an option to hike the short but steep Grinnel Glacier Overlook Spur.
In this post we’ll share complete details of this hike including 5 things you should know before heading out on the trail. We hiked this trail during July of 2023 and highly think this is a must-do hike in Glacier.
If you are looking for general information to help plan your visit, check out our Complete Guide for Glacier National Park or see information on hiking to Redrock Falls or Iceberg Lake in Many Glacier.
You might also like our 3 day Glacier Itinerary.
Our National Parks are full of epic hikes, sweeping vistas, and amazing ecosystems.  If you like our parks, you'll love our National Parks Newsletter or you can explore exactly how we plan a National Parks Trip.

Visiting all 63 National Parks?  Join the Club.
Overview of the Highline Trail
Distance: 11.5 miles
Elevation Gain: 1,950 feet
Difficulty: Challenging

Adding on the Grinnel Glacier Spur
Distance: 2 miles round trip
Elevation Gain: 970 feet
The Glacier Highline Trail can be hiked in several different ways. The hiking distances above describe hiking this as a point-to-point trail that starts at Logan Pass and ends at the Loop. From the end of the hike, take the free Glacier shuttle back up to Logan Pass.
You can also hike this in the reverse direction but will add significantly more elevation gain.
The parking lot at Logan Pass is large, but often fills up early. We arrived around 6:30 am and the lot was almost full. If you plan to spend the day hiking the Highline Trail, arrive early.
Many people hike the Glacier Highline Trail as an out-and-back from Logan Pass. This is a good option if you just want to go a few miles.
Finally, can also add on the Grinnel Glacier overlook spur. This is a short and steep climb up to a viewpoint. If you aren’t hiking to Grinnel Glacier on another day, this spur is worth it.
This hiking trail is usually open when the Going-to-the-Sun Road is open (June-October), but does close for bear activity. You can check the status on the NPS website.
To hike the Glacier Highline Trail, you will need a car reservation for the Going-to-the-Sun Road and you will also need to pay the park entrance fee.
This hike has many areas with drop offs, including narrow ledges. If you have a fear of heights, this may not be the trail for you. We found the ledges wide enough and never felt truly nervous, but saw several other people uncomfortable with heights.
Below you can find 5 things to know to help you plan your visit. Scroll down for a complete description of the Glacier Highline Trail.

Highline Trail Map

5 Things to Know about the Glacier Highline Trail
You need a Car Reservation for the Going-to-the-Sun Road
Glacier has a vehicle reservation system in place. In order to hike the Highline Trail, you need a reservation to enter the Going-to-the-Sun Road. You can make a reservation 4 months in advance or there are some spots held for the day before. Getting a reservation is very competitive.
If you don’t get a reservation, you can also enter the park before 6 am when the gates are staffed.
We had a reservation for Going-to-the-Sun Road but still entered before 6 am to make sure we could get parking and we’re glad we did as the lot was almost full.
In addition to the vehicle reservation, you also need the pay the park entrance fee or use your America the Beautiful Pass.

This in a Point to Point Hike with a Shuttle
There is free shuttle in the park that makes it easier to hike this trail as a point-to-point trail. You have a few options for how to do the shuttle. You can either park at the start or end of the hike (Logan Pass or the Loop).
If you arrive early, the shuttle won’t be running, so you should plan to park at Logan Pass and take the shuttle back to your car at the end of the hike. The shuttles are frequent but small and don’t always have room – if you are hiking with a large group, you may need to send just one person back to get the car.
If you arrive after 8am, you can also park at the Loop and take the shuttle up to the start of the hike. The benefit here is that you will have your car waiting at the end of the hike. The parking lot at the Loop is much smaller than Logan Pass.
Our party divided for the hike as a few of us did the extra spur up to the Grinnel Glacier Overlook. This meant that Dave and Freja reached the end of the hike first and took the shuttle back up to get the car and came back down to pick us up. The shuttle shuffle takes about 1 hour assuming you don’t need to wait too long for a shuttle.

Add on a Short and Steep Hike to the Grinnel Glacier Overlook
The Grinnel Glacier overlook is a short 1 mile each way hike to an incredible lookout over Grinnel Glacier. This trail is steep and gains elevation steadily. The trail also passes over several areas with steep drop offs, so if you aren’t good with heights you may want to skip this trail.
Once you reach the viewpoint, you will look directly down on Grinnel Glacier.
In our opinion the viewpoint is absolutely worth it, but this adds about 1.5 hours to a long day of hiking, so if you are tired when you reach the turnoff for this trail or if you are planning to hike to Grinnel Glacier on another day you can skip this part of the hike.
If you do decide to hike to the viewpoint, note that the temperature is often much colder, especially if there is some wind.

This is a Popular Hiking Route
The Glacier Highline Trail is one of the most popular hiking trail in the park and is often crowded. In addition to finding a parking spot, you can also expect to see many other people along the hiking route.
Since many people hike the Highline Trail as an out and back, this means that the first few miles of the hike take a bit of extra time, especially as you will need to go single file on some of the narrow sections.
The first part of the hike has the most narrow ledges, so if you are nervous about heights either skip this hike or

Expect to see Wildlife and Flowers
One of the best parts of this hike is the the views and wildlife along the route. This part of the park often sees bears, so you should plan to hike with bear spray. We did not see any bears along the route, but Dave and Freja saw a grizzly and 2 cubs cross the street right at the end of the hike.
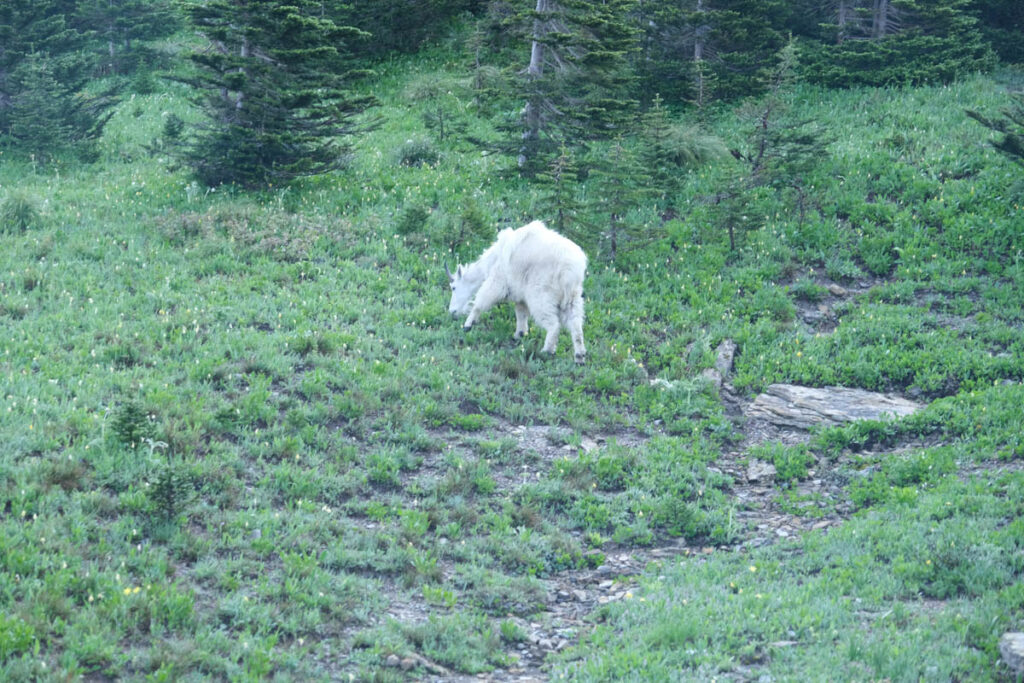
In addition, you will likely see mountain goats, deer, marmots, and more along the hiking route.
If you are hiking the trail in the spring or summer, you will also hike through several areas full of wildflowers. We loved the sweeping views of the mountains viewed across the fields of flowers.
Always practice leave no trace - pack in what you pack out, stay on marked trails and never feed or approach wildlife.

Details of the Glacier Highline Trail Hike
Below you can see details of our hike on the Highline Trail. We did this hike when Hadley and Fin were 15 and Freja was 11 and we had another 11 year old with us.
Start your hike at the Logan pass parking lot. There are some bathroom facilities here if needed. The highline road start just across the road from the parking lot at a well marked sign.
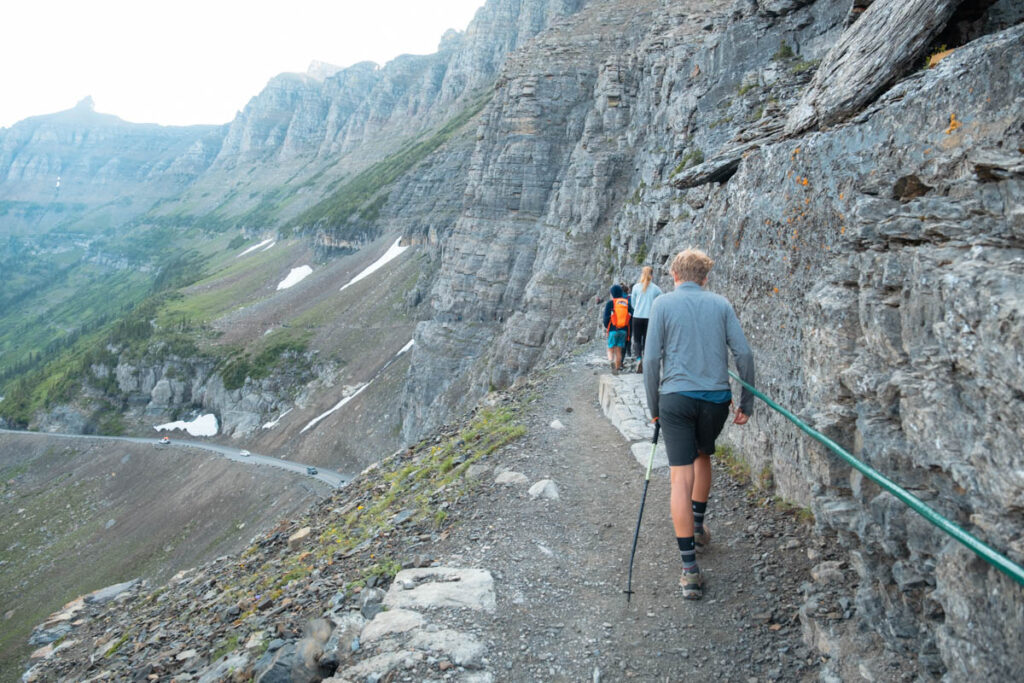
The First Mile
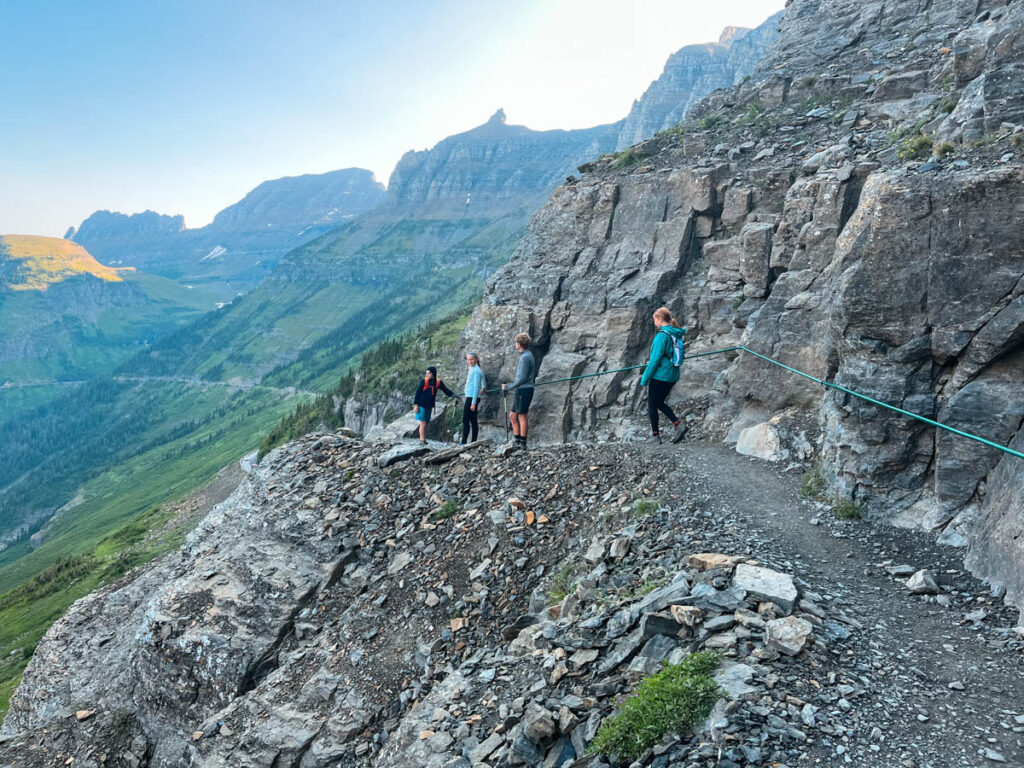
The first mile of the trail is the most thrilling as the trail follows a narrow ledge along the side of the cliff high above the Going-to-the-Sun Road. The trail is high above the road and there is a cable on the inside of the cliff to hold onto as you walk.
While there is a lot of exposure along this route, the trail is wide (4-6 feet) enough that as long as you take you time it was never too bad. This is the most exposed part of the hike. If you have a fear of heights, this might not be the best trail for you! On the other hand, the views along this part of the trail are incredible.

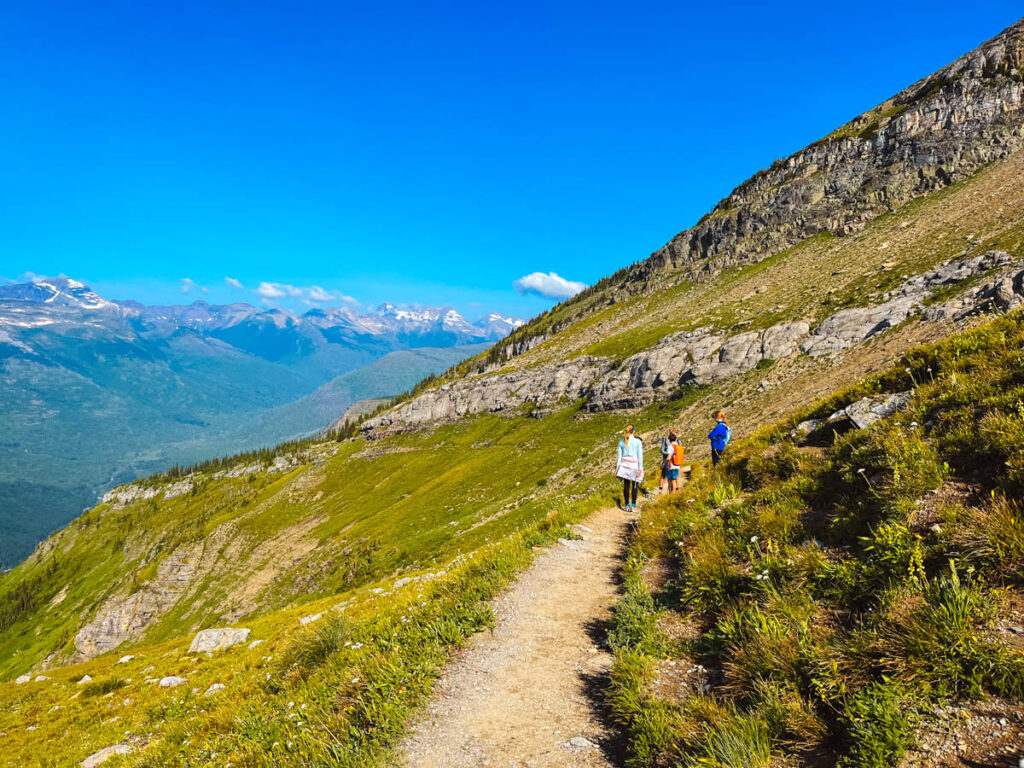
Garden Wall
The garden wall is a lovely stretch of the hike. The trail continues along the steep edge of the hillside, but you don’t have the same steep dropoffs from the first mile.
The trail passes through a series of fields and forests. In the spring and sommer many of these fields are full of wildflowers and the moutains make an increible backdrop. The trail throughout this area is easy walking and you can make good time.
We saw some deer, goats and marmots throughout this area and enjoyed the ever changing landscape and well as one patch of snow.


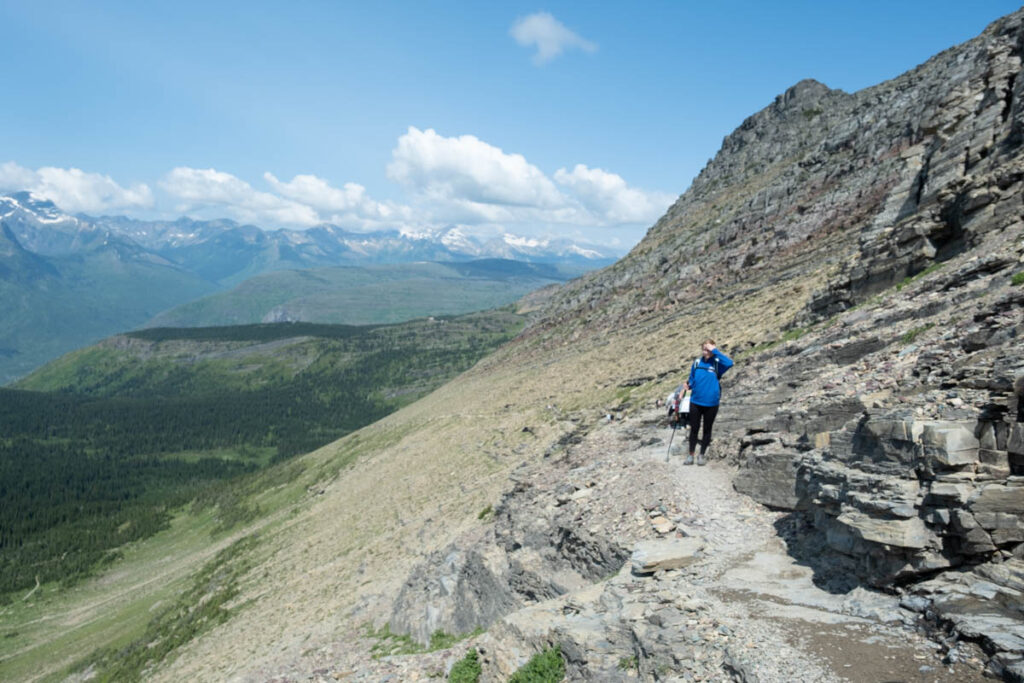
Grinnel Glacier Overlook
The turn to the overlook is clearly marked and from the base you can see the entire path to the gap.
I will say that from the bottom, the trail does not look very hard, but it is short and steep and takes about 1-1.5 hours to complete. This is a great way to get your heart pumping!
Towards the top of this trail the path passes along the top of a cliff area with drop offs and uneven footing. This area was more unstable that the first mile of trail along the cliff face, so use caution. Once you reach the top, the Grinnel Glacier is directly below you.
The view is 100% worth the climb, so if you have enough energy left, we highly recommend hiking up to the top.

Granite Park Chalet to the Loop
The chalet is the next stop along this route. While you can spend the night here, this is also a great place to stop for a break and a snack. There are some basic restrooms and you can purchase food or water at the chalet (although it is a bit pricey). We stopped quickly and then headed down to the Loop Trail.

The trail downhill from the chalet is where you really lose elevation. The trail steadily (and relentlessly)descends downhill through forest and thick fields. The top of the trail is pleasant, but after the long switchbacks under the hot sun it begins to get a bit monotonous.
You will see the bottom of the trail and the river below. The trailhead is just about at this level and you will cross a bridge just before getting to the trailhead.
This is the area where you are most likley to see a bear so make sure you talk along this section! We sang songs and played games and had our bear spray ready. Much of the foliage is high and we were ready to be surprised by a bear as we walked.
While we didn’t see a bear of the trail, right at the trailhead Freja and Dave saw a mother grizzly with 2 cubs cross the street (at a crosswalk!). Dave and Freja were waiting for the shuttle and the bears crossed about 15 feet from them but paid no attention and simply continued on their way.
The shuttle stop is near the trailhead and you want to make sure you get on the shuttle going eastbound back up towards Logan Pass.

What to Bring with you for the Glacier Highline Trail
This is a popular but challenging and long hike. We saw many people underprepared ont he trail wearing sandals and jeans.
- Sturdy and comfortable hiking boots or shoes
- Plenty of water and snacks (at LEAST 2 liters/person)
- Sunscreen
- Bear Spray
Want to Learn More About Traveling to US National Parks?
We are on a mission to visit every US National Park. You can see the parks we’ve visited as a family on our National Parks page or see more about the 1 month itinerary that started this journey.
Some of our favorite National Parks include: