
Your phone is an amazing tool to take better travel photos. Not only is it incredibly powerful, but it is also easy to carry and right in your pocket.
This article is part of a series on taking better photos with your phone when you’re on the road. You can find more here: Why your phone is perfect for taking better travel photos.
Before we get into some of the specific techniques for taking amazing photos, it’s helpful to set up your camera correctly and to learn some of the basic functions.
Ready to take your travel photography to the next level? Join the 7 Day challenge for FREE - just sign up for my newsletter and I'll send you the link. You can also get access to my beginner course on travel photography.
Understanding Camera Modes
The iPhone camera comes with multiple modes designed to optimize your photos for different scenarios. It’s important to know when to use the different settings.
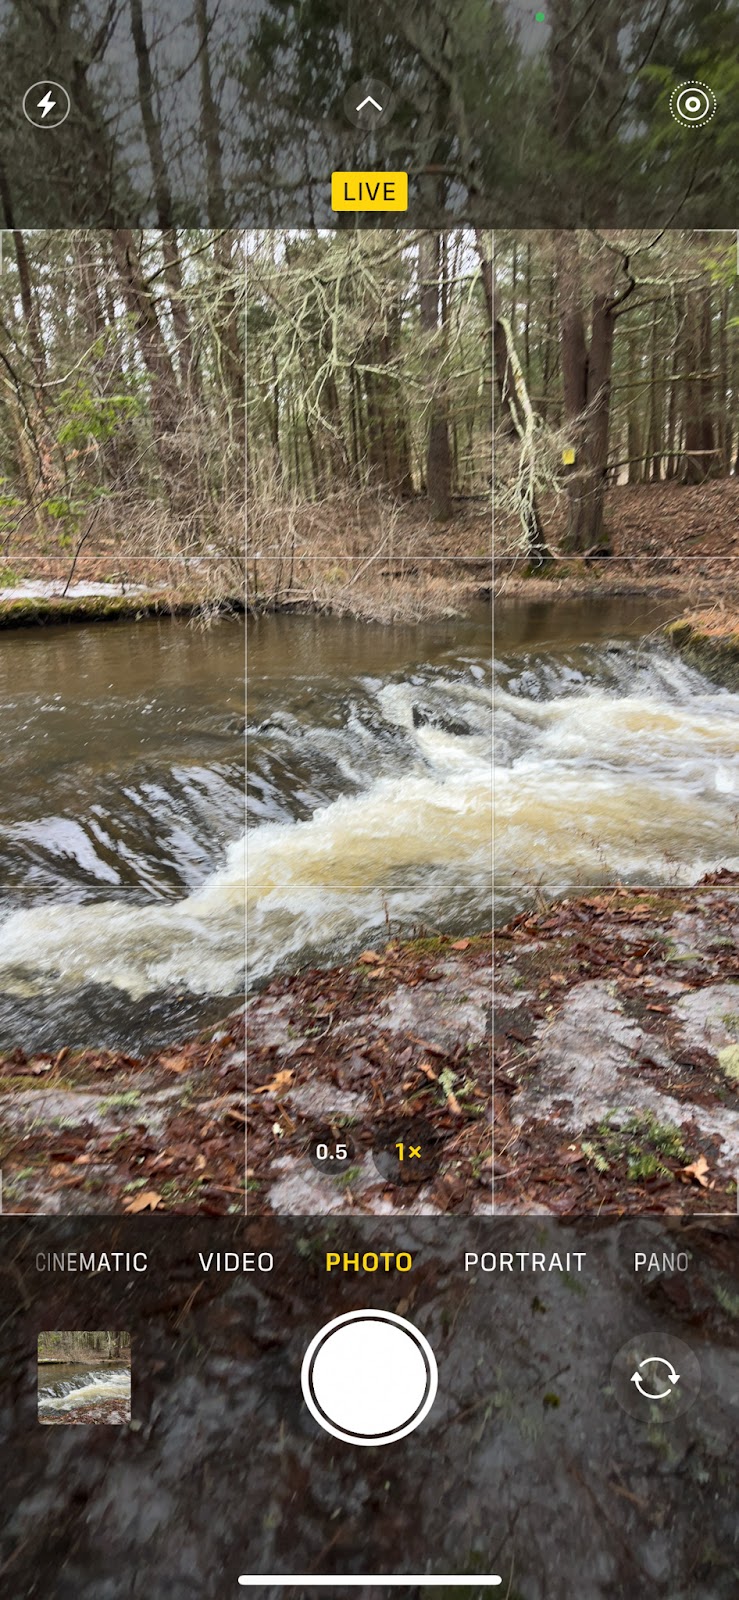
Photo Mode
This is the default mode on your iPhone and works well for most general photography. It automatically adjusts exposure and focus, allowing you to capture sharp images with balanced colors. Use this mode for quick snapshots, landscapes, and everyday travel moments.
Pro Tip: Tap on your subject to set the focus and hold your finger down to lock the exposure. This ensures the camera doesn’t readjust settings mid-shot. This is easy, fast and what I use for the majority of my photos.
Portrait Mode
Perfect for taking portraits with a blurred background (bokeh effect), Portrait Mode works best when photographing people but can also enhance food, pets, or architectural details. Essentially it changes the depth of focus (or the amount of the photo that is in focus) and makes the subject in focus while blurring everything else.
Newer iPhones allow you to adjust the level of background blur both before and after taking the shot. These are best shot in good light and work well for food photos or emphasizing small objects.
Pro Tip: If you’re taking a portrait photo – also take a few shots in photo mode. This gives you two options when you go to edit.

Night Mode
When traveling, you’ll often find yourself wanting to capture evening cityscapes, starry skies, or dimly lit interiors. Night Mode automatically activates in low-light conditions, using longer exposure and advanced image processing to brighten the scene without excessive noise or blur.
Some phones have a built in mode for this while some simply do this automatically in photo more.
Tips for Better Night Mode Photos:
- Hold your phone steady or use a mini tripod to avoid camera shake.
- Adjust the exposure time manually (up to 30 seconds on some models) for even better results. We’ll discuss how to do this later.
- Look for light sources, such as street lamps or neon signs, to create dynamic compositions.
Panorama Mode
For landscapes, sweeping cityscapes, or capturing the vastness of a destination, Panorama Mode allows you to take ultra-wide, high-resolution photos. Simply move your iPhone in a straight, steady motion while following the on-screen guide.
This is one mode that is fun to have but is something I use infrequently. I suggest you experiment a few times taking a panorama photo before you travel.

When to Use It:
- Capturing wide mountain ranges, coastlines, or large historic sites.
- Creating unique perspectives of streets, markets, or festivals.
- Shooting inside grand cathedrals, palaces, or museums to showcase vast interiors.
Time-Lapse, Cinematic, & Slow-Mo
At the end of this ebook we’ll get into videography, but for now, these are 3 common video modes you’re find on phones.
These video modes help you get creative with movement. Time-Lapse condenses long events into short, visually compelling clips, Slow-Mo captures fast action in dramatic detail and Cinematic takes a high quality video.
Examples of Travel Uses:
- Time-lapse a sunrise over the ocean or a bustling city street.
- Use Slow-Mo to film waterfalls, kids jumping, local dance performances, or waves crashing on the shore.
Essential Settings for Travel Photography
To get the most out of your iPhone’s camera, adjusting key settings can make a significant difference in your shots. Below are the most common settings and the ones I use on my phone when I’m taking travel shots.
HDR (High Dynamic Range)
HDR blends multiple exposures to balance highlights and shadows, making it perfect for scenes with bright skies and dark foregrounds.
When to Use HDR
- Capturing sunsets and sunrises to enhance colors and contrast.
- Shooting inside buildings with windows to balance interior and exterior lighting.
- Taking photos in harsh midday sun to prevent overexposed skies.
How to Use HDR
If your iPhone supports Smart HDR (iPhone XS and newer), HDR is automatically applied when needed. However, you can control it manually:
- Go to Settings > Camera and toggle Smart HDR OFF.
- This will bring back the manual HDR option in the Camera app.
In the Camera app, look for the HDR icon at the top of the screen.
- If you see it, tap to turn HDR on, off, or set it to auto (where the iPhone decides when to use it).
Format
Most phones allow you to choose the format to save your photos and videos. You image will either save as a high quality versus a jpg. The file size for these are also different. A jpg takes up less space. This matters most if you want to print your photos, zoom in on specific things or need a high quality photo – otherwise jpg is fine.
Live Photos
Live Photos record a few seconds before and after you press the shutter, creating a short, animated clip. This is great for capturing movement and selecting the best frame later although there are some drawbacks to live photos as well.
Live photos take a short 3 second video which consists of 45 shots. Most of the photos will be blurry or not great – but you might get one good photo. The biggest negative of live photos is that it takes up a lot of storage space on your phone.
Live photos are great if you’re taking photo with a lot of action or when I’m taking a photo of a group of people who might all blink and smile at different times. You can also use live photos as a short video or boomerang.
Pro Tip: One of my favorite ways to take live photos is to convert live photos into GIFs or long-exposure images for artistic effects.

Burst of Photos on Your iPhone
To take a number of quick photos in a row, you can use the burst setting on your phone. This is great for action shots
To Activate Burst Mode: Tap and hold the shutter button, or swipe the shutter button to the left and hold it. This will trigger Burst Mode, causing the camera to rapidly capture multiple photos in quick succession.
Your Burst Photos will appear as one photo. After taking a burst of photos, open the burst in the Photos app and tap “Select” to choose the best images. Tap the circle on the ones you want to keep, then tap “Done” to save them and delete the rest.
Gridlines & Composition Tools
Enabling gridlines in your camera settings helps you compose better shots using the Rule of Thirds, where important subjects are placed along intersecting lines for a more balanced and natural look. We’ll get into the Rule of Thirds in the next chapter.
How to Turn On Gridlines on iPhone
- Open the Settings app.
- Scroll down and tap Camera.
- Under Composition, toggle Grid to ON.
Once enabled, you’ll see a 3×3 grid overlay in the Camera app, helping you position subjects and balance your shots.
How to Use Composition Tools:
- Align the horizon along a gridline for more stable landscape shots.
- Position subjects off-center to create a more dynamic photo.
- Use leading lines (roads, rivers, fences) to guide the viewer’s eye through the image.
Flash
Turn it off! There are very few situations where a flash creates better photos. It’s generally best to leave off the flash and only turn it on when you really need it. Not only does the flash give an unrealistic photo, but you don’t want to accidently use the flash in a place you aren’t supposed to.
Zoom
Don’t zoom in to take photos on your iphone. This changes the quality of the photo and will leave you with a grainy photo. Instead, take your photo and crop it later in editing.
Taking Wide Photos
Here is one trick for taking wide photos. You may notice that when you are taking photos on your phone, it doesn’t capture the full width of your screen. If you want a wider shot, switch to video mode – you will likely notice a small capture button that pops up. Use this to take a photo.
Adjusting Focus & Exposure for Sharper Images
Even with an advanced camera, fine-tuning focus and exposure can take your photos from good to great. There are a few tips to getting the right focus on your photos.
Manually Adjusting Focus
While the iPhone automatically focuses on the main subject, you can override this by tapping anywhere on the screen. I find that the autofocus is pretty good, but there are simply times it chooses the wrong subject in my photo – especially if I’m using a foreground. Using manual focus is useful when shooting:
- A person in front of a scenic background (tap their face to prioritize them).
- A detailed object like a flower, plate of food, or architectural carving.
- A landscape where you want sharp foreground details (like rocks or flowers in the frame).
Pro Tip: Use the “AE/AF Lock” by holding your finger on the screen until you see a yellow box. This keeps the focus and exposure locked, preventing unwanted adjustments. Do this right before you take the shot.
Controlling Exposure for Balanced Lighting
Sometimes, your camera will make a scene too bright or too dark. You can sometimes fix this later with editing or you can do it in the moment by adjusting the exposure slider:
- Tap on the area you want to expose correctly with a quick tap
- Slide up to brighten or down to darken the image.
When to Adjust Exposure
- To avoid overexposed highlights in bright sunlight.
- To bring out details in shadows during sunrise or sunset shots.
- To properly expose faces in backlit conditions.
Holding Your Phone Still Matters
How still you hold your phone matter – especially if you are shooting in low light. There are times when you can take photos quickly with one hand to capture a moment, but for most shots it’s best to stabilize the phone with two hands. You can also rest the phone steady object or use a tripod to get the best shots.
Using the Filter Mode
There are several filters you can select when taking photos. I recommend not using a filter when you are taking the shot. Instead do your editing after you’ve taken the shot.