
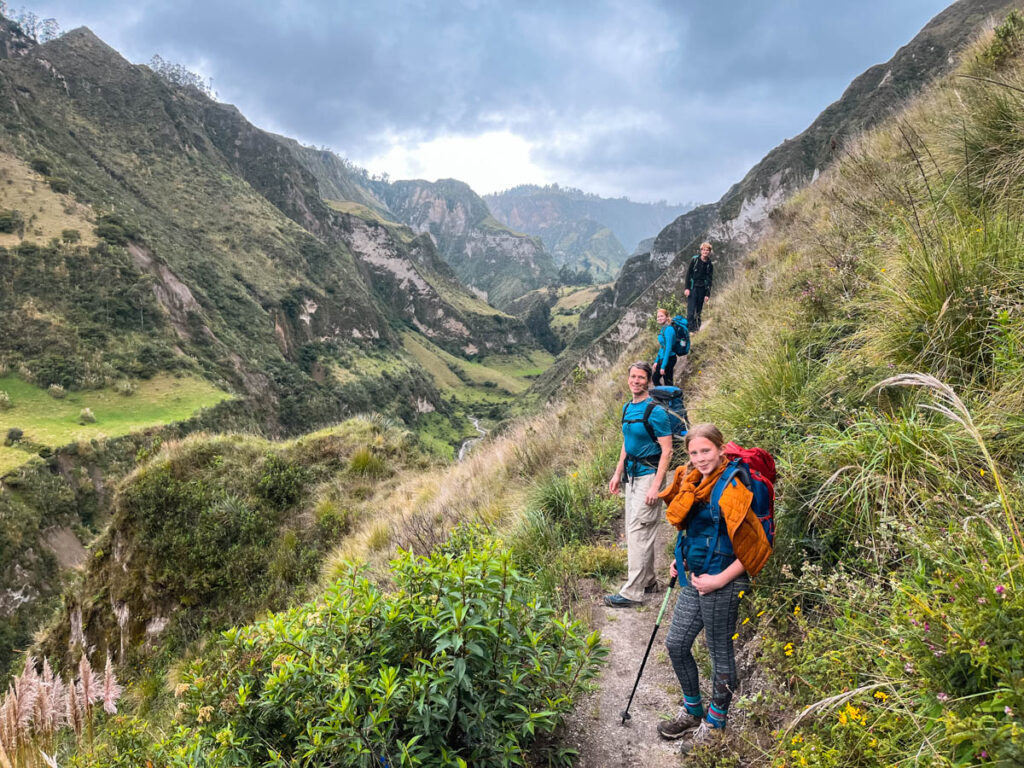
The stunning Quilotoa Loop hike offers sweeping views of the high Ecuadorian Andes and the incredible Quilotoa Lagoon in the Cotapaxi region. Hiking from village to village, this challenging and rewarding hiking route is one of the best treks in South America and can be done on your own with no guide. This Quilotoa Loop trekking guide provides everything you need to know for hiking this incredible multi-day route.
Typically done as a 3-day hike, you will spend most of your time walking up a river valley through farmland and up and down steep slopes above the valley floor all while ascending to the rim of the Quilotoa Crater. While this trail can be hiked in two different directions, most people finish their hike at the gorgeous Quilotoa Lake nestled in the crater of an erupted volcano.
In this guide you can find general information to help you plan your hike such as where to stay and what to pack and complete hiking details to help you find the trail and not get lost along the way. If you are looking for more details on the hiking trail, check out: Quilotoa Loop Map and Hiking Tips: How to Plan This Epic 3-Day Trek in Ecuador.
As a family we hiked to the Quilotoa Loop during February of 2023. At this time our kids were ages 14, 14, and 11 and while we found this challenging, we all agree that this was one of our favorite hikes we’ve ever done.
If you are looking for other ways to visit Quilotoa Lake, check out: How to Visit Quilotoa Crater Lake.
I’ve spent decades exploring family adventures, epic hikes, and National Parks across the world. For more inspiration, check out my National Parks Page or see some of my favorite destinations to plan your next adventure and make sure to join my weekly newsletter.
Overview of the Quilotoa Loop Trek
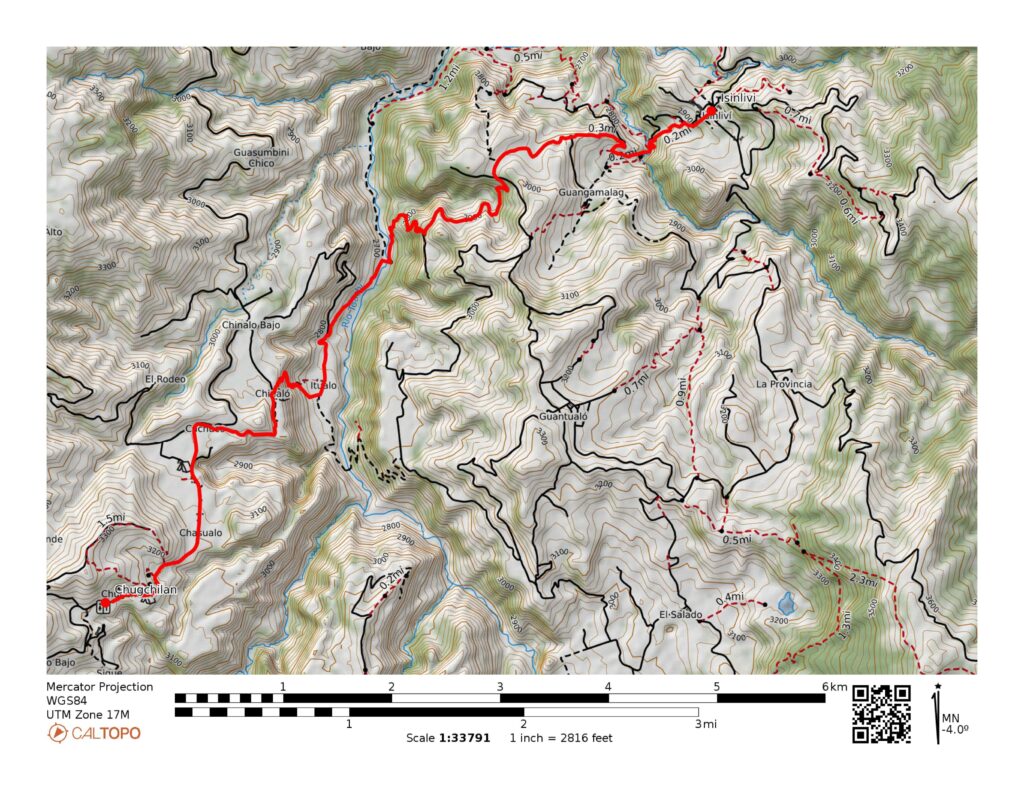
The Quilotoa Loop is not actually a loop at all, but a one day trek in the high Andes. The trail follows some of the 200 km of Andean trails in the Cotapaxi region and there are multiple ways to actually complete the routes. The standard route is to start in the town of Sigchos (take a bus from Latacunga) and hike to Quilotoa over 3 days, stopping in the towns of Isinlivi and Chugchilan.
If you aren’t up for a 3 day trek, but still want to visit Quilotoa Crater, you can also visit on a day tour or spend the night in Quilotoa. The Quilotoa hike is a beautiful and challenging hike that takes you around the rim of the crater and down to the waters edge. You can see a few tour options below.
The Quilotoa Lake is hands down the highlight of this trek. This remarkable crater was created in the 13th century when the volcano collapsed forming a 3 km crater lake and sending lava all the way to the Pacific coast. As the westernmost of Ecuador’s volcanos, this volcano still has some activity but has remained dormant for over 800 years.
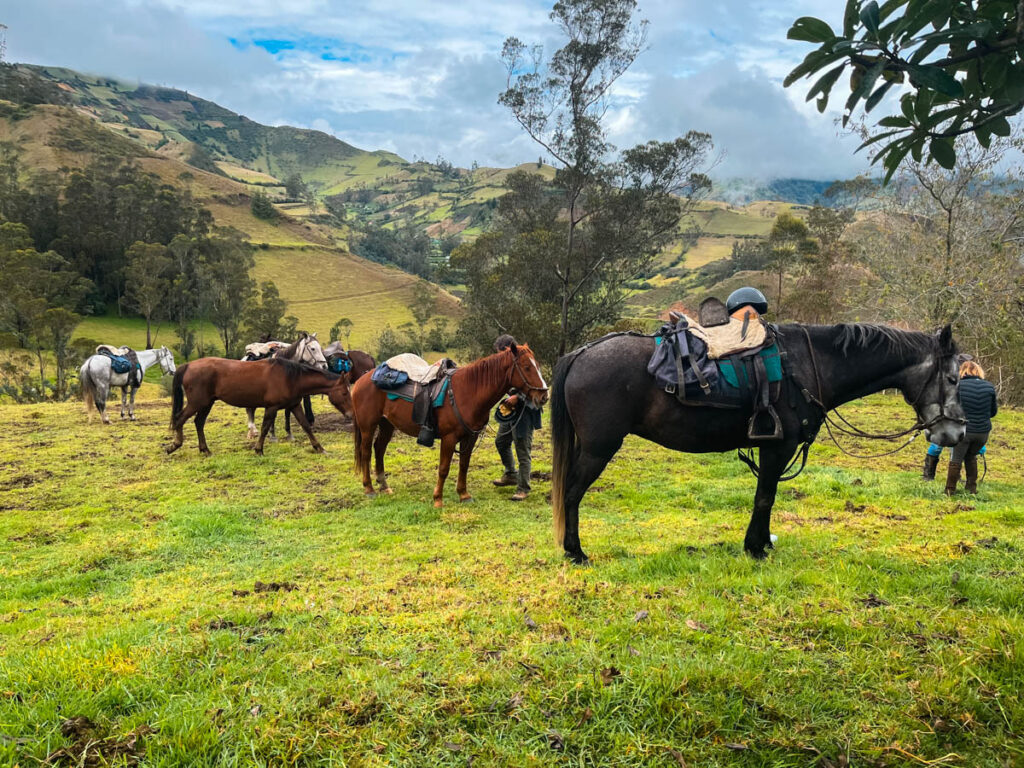
The Quilotoa Loop is a popular hiking trail and you will find many other hikers doing the same route – we made some great friends over just a few days. If you have more time, it’s worth spending additional night on the loop and taking time to do some of the activities available such as visiting cheese making operation, riding horses, or biking.
You can find many excellent lodging options along the trail, making it an easy place to walk and carry only a small bag.

How to use this Guide this Quilotoa Loop Trekking Guide
This guide has loads of information for you to help plan your trip and details on exactly how to take this hike. You can find a brief overview of the hike in the section directly below and complete hiking details near the end of this post.
You can also find packing information and a planning checklist to make sure you are prepared for this trek. There are several maps below you can use for your hike, but we strongly recommend downloading maps.me to help with navigation on the trail.
Click on the free planning checklist and instantly download and save this document so you are prepared for this hike. Every place we stayed also had written or downloadable directions for the next days hike.
If you are hiking the Quilotoa Loop in the opposite direction, you can still use this Quilotoa Loop trekking guide for planning purposes.

Quilotoa Loop Stats
Here is a snapshot of the Quilotoa Loop Hike. There are several options for hiking the trail, so you will likely see different trail mileage and elevation gain. The Quilotoa Loop trek can be done in either direction and is typically done over 3 days. The stats below describe hiking the loop from North to South (or from Sigchos to Quilotoa).
Distance: 24 miles
Elevation Gain: 7,000 feet
Difficulty: Challenging
Highest Elevation: 12,770 feet
Descent (or elevation gain in the other direction): 4,000 feet
Below is a short description of each day. If you scroll to the bottom of this post, you can see complete details for each day of this hike.
Day 1: Sigchos to Isinlivi
Distance: 7 miles
Elevation Gain: 1,600 feet
Timing: 3-5 hours
Day one starts at the bus stop in Sigchos and descends into the river valley before ascending back up to the town on Isinlivi. This is the shortest hiking day but the ascent up to Isinlivi is steep and challenging.

Day 2: Isinlivi to Chugchilan
Distance: 8 miles
Elevation Gain:2,200 feet
Timing: 4-6 hours
Day two descends back into the river valley before following along the river for a few miles. There are several routes that you can take this day and you can see a complete description of this below. We chose to hike through the town of Ivualo. Before crossing the river another time, the trail turns to the right and ascends a challenging slope up the far side to Chugchilan.
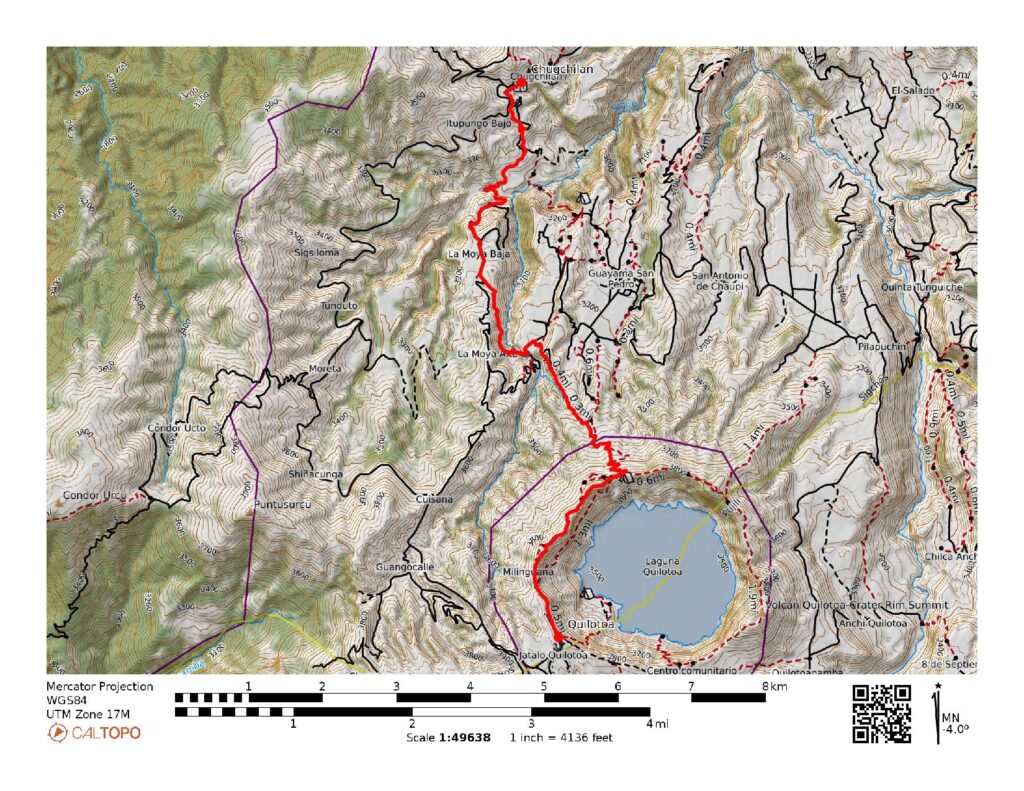
Day 3: Chugchilan to Quilotoa
Distance: 7.5 miles
Elevation Gain: 3,300 feet
Timing: 4-6 hours
This is the most challenging hiking day and is also the day where you are at the highest elevation. The trail descends rapidly to the river to start the day and then spends the rest of the day ascending up to the rim of the crater. This last section is steep and challenging.
Once you reach the rim, you have the choice to go clockwise or counterclockwise around the rim. Just walking around the rim is challenging. The easier and faster route is to turn right and follow the rim in a counterclockwise direction. If you have time and energy for a few additional hours of hiking, turn left. This section of the hike still involves some elevation gain and loss.
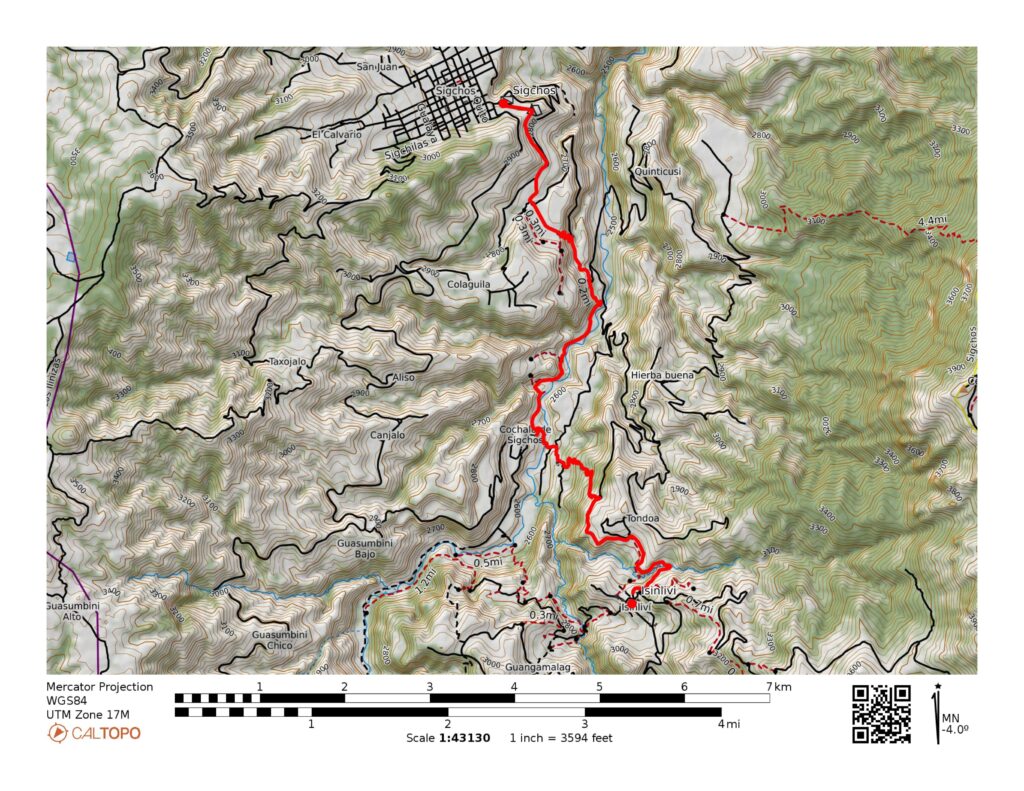
Map of the Quilotoa Loop Trek
Below is a map of the Quilotoa Loop that includes the hiking trail as well as the bus routes from Latacunga. Make sure to download the map of the region at maps.me to help with navigating. See more details on the Quilotoa Map.
To use this map, you can click on it and save it to your own drive. This allows you to make your own changes to the map as needed.
Top Tips for the Quilotoa Loop Hike
In the remainder of this post we go into details of every aspect of the Quilotoa Loop Trek, but I wanted to share some of our top tips for hiking this incredible loop.
- Pack light and stay in hostels. You can leave your extra gear in Latacunga and it is lovely to hike the a lighter pack
- Download Maps.me to help you navigate along the trail
- Pack warm and waterproof clothing since you will be hiking at elevation
- Enjoy the incredible scenery along this stunning and challenging loop
- Don’t underestimate the elevation. If you are coming from sea level, give yourself time to acclimate.
- Enjoy the excellent lodging options along the way
- Be respectful of the locals and the farmland you will be travelling through. This includes practicing leave no trace and shutting all gates to keep animals contained
- Get bag lunches from the hostels along the route
- Refill your reusable water bottle at each hostel along the way (they all have big jugs of filtered water)
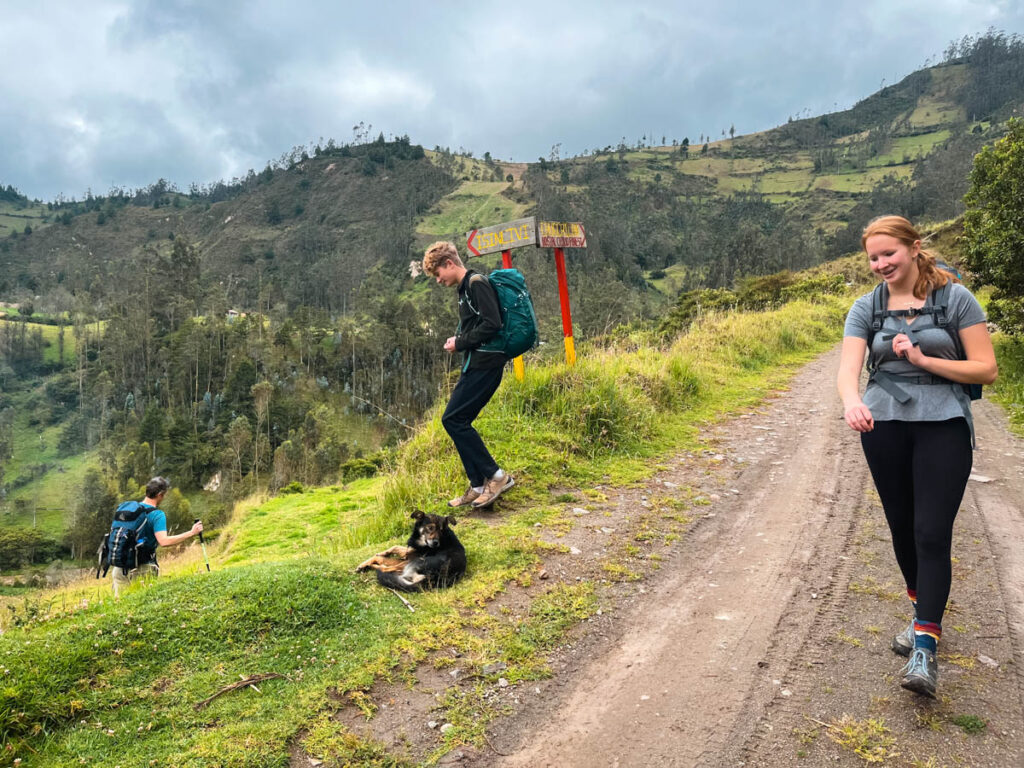
- Be aware of the dogs along the way. We didn’t have any trouble, but if you are concerned about dogs, carry hiking poles or pretend to pick up a stone and the dog will likely scamper
- Get health insurance in case you have an emergency on the trail.
- Wear sunscreen! We forgot one day when it was cloudy and got toasted
Which Direction Should you Hike the Quilotoa Loop?
The Quilotoa Loop is actually not a hiking loop at all. It is actually a one way hike that only becomes a loop when you add in the bus routes to and from Latacunga. You can do the 3 day hike in either direction and there are benefits to hiking in either way. The major difference is the amount of elevation gain and whether you want to end at the Crater lagoon or in the towns of Sigchos.
Sigchos to Quilotoa (north to south)
This is the more common hiking route and ends at the gorgeous Quilotoa Crater Lagoon. This means that during your hike, you have something to look forward to and it is a great motivator. On the other hand, hiking this route means you gain the most elevation as you are starting around 9,500 feet and ending at 12,700 feet. If you are coming from sea level this does give you more time to acclimate.
Quilotoa to Sigchos (south to north)
Hiking the Quilotoa Loop in this direction is easier, but you still have significant elevation gain (although less than the other direction). Every day involves hiking down to the bottom of the river valley and back up so even if you hike this direction you will have some steep uphill sections.
In my opinion, the negative of hiking this direction is that your final destination is the town of Sigchos which is slightly anticlimactic after the long hike. If you are ok with this, then hiking the Quilotoa Loop in this direction makes sense.
The description of the route below outlines the hike from Sigchos to Quilotoa, but you can find lots of useful information for hiking it in the other direction below.
When to Hike the Quilotoa Loop
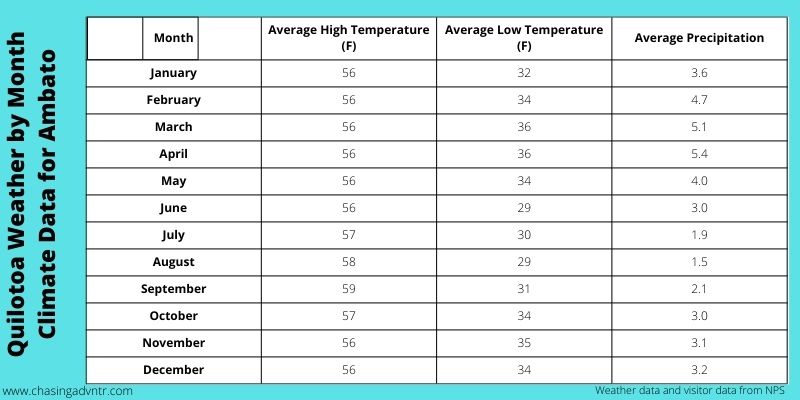
The Quilotoa Loop can be hiked all year round, but the best time to do the trek is during the dry season between June and September. There is a second dry period towards the end of December and January.
Like other mountainous regions around the world, weather here can be unpredictable. In general, the mornings have better weather and the afternoons are more likely to have rain. We did the hike at the end of February and everyday had a 100% chance of rain, yet we did the entire hike without every getting wet. Be prepared with rain gear and try to hike early to avoid the rain – most of the rain falls after 2:00 pm.
The table below show the average temperatures and precipitation amount at Ambato near Quilotoa. Note the consistency in the temperatures. The precipitation amount also does not reflect when in the day the precipitation falls.
Altitude and Trail Difficulty
This trail is typically described as difficult/challenging, but there are a few things important to note. Since this is a 3 day hike that gets progressively harder each day, it is a hard hike. We are a hiking family who often do 6-10 mile hikes in New Hampshire with significant elevation gain and we found this hike hard but still enjoyed the trail even with an 11 year old. That said – if you are in decent shape and have acclimated for a few days you will probably be fine to do this hike.
None of the trails themselves are specifically hard walking, and you are actually hiking a lot of the time on dirt roads. There are a few steep sections and some of these section do have switchbacks. With some easy walking you could make good time on the flat sections and take your time on the uphill.
The altitude is what made this hike challenging for us. We flew to Quito from sea level and spent a night in Quito and a night in Latacunga before setting off on the hike from Sigchos. With this amount of acclimation, we all felt the altitude, and some of us felt it more than others.
Even if you are acclimated, on the final day you will ascend an additional 2,000 feet or so and this elevation change will likely make the hiking more challenging. To help with the altitude, give yourself extra days at elevation to adject, drink plenty of water, and try to get sleep.
Transportation to and from the Quilotoa Loop Hike
Getting to the Quilotoa Loop can seem challenging, but really is not difficult. We spent a lot of time before the hike worrying about bus times and schedules. In general there are two ways you can organize transportation – take a private transfer or taxi, or ride a public bus. The buses are easy to ride and inexpensive and are generally the best way to get to the start and end of the hike. Below you can see information about taking the buses, but you can also arrange private transportation in Latacunga.
See a Guide to Ecuador Bus Travel.
Getting to Sigchos from Latacunga
The bus runs several times a day from Latacunga to Sigchos. The bus times change periodically and they are typically not available online so the best way to get the bus times is right at the station. There is usually an early morning bus and then several more buses throughout the morning. We took at 8:00 am bus.
The bus takes about 90-120 minutes to get from Latacunga to Sigchos and pulls right into the bus station in Sigchos and costs between $2-$3 pp. This is a very easy way to get to the start of the Quilotoa Loop. We met several other people who took the 9:30 bus and easily finished the hike. The few people who took a later bus ended up hiking in the rain and dark, so try to get a morning bus.
If you are hiking in the other direction, you can also find buses that go to the town of Quilotoa.

Getting from Quilotoa to Latacunga
Buses run throughout the day from Quilotoa to Latacunga. We found mixed information online about what time the buses run and how late in the day you can get a bus. If you are hiking from Chugchilan to Quilotoa, you can simply wait for a bus in town once you finish you hike. Another option is to spend the night in Quilotoa and get the bus early the next morning.
If you arrive late in the day, you can also get a ride from town down to the town of Zumbahua where there are more frequent buses. There are many people who will offer you a ride in town for about $1/person. Note that they may tell you in town that there are no more buses and then offer to drive you – we ended up getting a ride down to Zumbahua only to get on a bus that came down from Quilotoa. If you have time, it’s worth waiting in Quilotoa for a bit to see if there is a bus.
The bus from Quilotoa to Latacunga takes about 2 hours.
Getting to Latacunga
Latacunga is located south of Quito and is easy to reach by bus. Below are some common bus times from other areas in Ecuador:
- Quito to Latacunga: 2 hours
- Banos to Latacunga: 2 hours
- Guayquil to Latacunga: about 7 hours

Where to Stay on the Quilotoa Trek
There are many great places to stay along the route and many of the best places offer breakfast and dinner including in the price of lodging. You can also purchase drinks, snacks and a bag lunch at many of the hostels.
If you have more time and want to spend more that 3 days on the trail, you can easily spend 2 nights at many of these hostels and explore the area more extensively. Below you can find suggestions on places to stay or you can search for places on booking.com.
Where to Stay in Latacunga and Leaving Luggage
Latacunga is the base for the Quilotoa Loop and is the perfect place to stay before and/or after your trip. If you are traveling with more gear, this is also the perfect place to leave some things behind so you are only carrying what you need on the hike. Most of the places in Latacunga will store gear. Latacunga has some great options for place to eat and a pretty park, but isn’t the most interesting city to explore.
We chose to stay at the Villa de Tacvnga Hotel before and after the hike and left our stuff here during the hike itself. Below you can see a few options for lodging based on your budget.
Villa de Tacvnga Hotel – right in town and about a 15 minute walk from the bus station. There is a large courtyard and views of Cotapaxi from the rooftop. Rooms are good and we especially liked our rooms on the upper floors the second night of our stay. This is one of the more expensive places to stay in Latacunga.
Hotel Huasicama – this is an eclectic and fun place to stay. The walk to the bus station is about 20 minutes or you can take a taxi. This places gets great reviews. This is a mid-priced option.
Hostel Tierra de Fuego – This is an inexpensive place to stay in Latacunga. We met a few people hiking the loop that stayed here and it is a great option for a shared bed in the town.
Where to Stay in Sigchos
Most people arrive in Sigchos by bus and begin their hike immediately, however, it is possible to stay in Sigchos the first night and start your hike the next morning.
Hosteria San Jose de Sigchos – this is a great property with an indoor pool and sauna. This hosteria is a bit outside the town of Sigchos and offers activities if you plan to stay in the area.
Where to Stay in Isinlivi
Isinlivi is a small town and we spent the first night of our Quilotoa Loop hike staying here. There are two great places to stay in Isinlivi and they are both great options depending on your budget.

Llullu Llama Mountain Lodge – This is where we stayed and can easily say that it was our favorite place we stayed while in Ecuador. The common spaces are fabulous, the view is great, the rooms are comfortable and there is a sauna/hot tub that you can rent by the hour.
See our review of Llullu Llama Mountain Resort.
Hostal Taita Cristobal – This is another great option for lodging in Isinlivi with gorgeous views and delicious food. You can book a private room or a bed in a shared room.
Where to Stay in Chugchilan
Chugchilan is a larger town than Isinlivi and has a few more lodging options.

Hostal Cloud Forest – We stayed in this popular and great hostel. The cost for the night is reasonable and includes dinner and breakfast. You can get a bed in a shared room or book a family room or double as we did. There is a fun common space with pool tables and other games.
Hostal el Vaquero – This is a small bed and breakfast on the outside edge of Chugchilan that offers lodging for a reasonable price.
Black Sheep Inn – this is wonderful eco-lodge with good rooms with their own fireplace to stay warm. Lodging is reasonable and includes meals.
Hotel Lagoon Resort – This is a fun and reasonably priced hostel in Quilotoa. There is food and games available on site and is a popular place for hikers or bikers.
Other places to consider in Chugchilan include:
Where to Stay in Quilotoa
Quilotoa is a reltaively large town that has a number of places to stay and eat. In addition to lodging for people hiking the Quilotoa Loop, many people spend the night in Quilotoa and hike around the rim or simply visit the gorgeous Quilotoa Lagoon. If you have time and don’t want to catch the bus back to Latacunga, spending the night in Quilotoa is a great option.
Runa Wasi Quilotoa – this hotel is one the more expensive side and offers excellent rooms and has a restaurant on site
Hostería Chukirawa – This is a great option with lodging right in town near the park and bus station. The is a restaurant on site with good food.

Camping on the Quilotoa Loop
Despite the number of places to stay on the Quilotoa Loop, there were several people we met who were camping along the route. These campers simply ended at one of the hostels and then paid a small fee to pitch a tent. This gives you some basic facilities and you can pay for meals or eat your own food. It’s worth checking at the different hotels and hostels on the Quilotoa Loop.
In addition, wild camping is also possible along the way. Be aware that much of the land along the way is farmland.
What to Pack
Assuming that you are staying in hostels and hotels along the Quilotoa Loop, you can pack everything you need into a relatively small bag to carry along the trek. There is no need to to pack a large bag as the most you will likely hike in a single day is 6 hours. Since you will be hiking from village to village during the Quilotoa Loop hike, you can resupply water and food as you go.
If you are camping you will need to include additional camping gear on this list.
Clothing
Below you can see exactly what we wore, used and found necessary when hiking the Quilotoa loop. Note that the temperatures are very consistent throughout the year and are cool since you are at elevation. You should expect rain on most days. We packed many of the items on our favorite hiking gear list – you can see more details about some of that gear here.
T-shirts – We each packed and used 2 shirts on this hike. Choose shirts that are quick drying. Two shirts lets you hike in one shirt and change into something clean for the night.
Long sleeved Layer – this layer should also be synthetic and act as a mid layer. I brought a light fleece layer but the rest of the family brough a lightweight synthetic layer. If you want to bring an extra layer I would bring an extra long sleeved shirt.
Rain Jacket and Pants – This layer is important and not only keeps you dry but gives you a windbreak and warm top layer when you are hiking (especially on the last day when it can be windy around the Quilotoa rim.
Shorts – we did not bring a pair of shorts, but wish we had brought one lightweight pair for the warm part of the day.
Pants – pack 1-2 hiking pants/leggings. We wore pants to hike most days and it was nice to have a pair of pants to change into in the evening.
Down Layer or Fleece Jacket – this is one of our go to layers and we each have a packable down jacket when we travel anywhere
Hiking Socks – bring along 2 good pairs of hiking socks
Hiking Boots – The Quilotoa Trails are generally easy walking, but it is definitely best to wear hiking boots with some ankle support. You can also bring an additional pair of shoes for the evenings although we decided not to carry more shoes. Sneakers or flip flops work well as an extra pair of shoes. Always try to break your shoes in for a while before setting off on a long hike.
Underwear and Sports Bras – wear and bring what works best for you
Hats, Gloves and Headwear – you should plan to bring something to wear on your head. This could be a hat or a neck gator that doubles as a hat. I typically bring something like this neckgator but the kids decided to bring winter hats. While gloves are often recommended, we decided not to bring gloves and didn’t miss having them.
Personal Items
Bring along the minimum personal items you would take on an overnight. Some of the items below are optional based on your preferences.
- Toothbrush and Paste
- Sunglasses
- Sunscreen
- Deoderant
- Lotion
- Wet Wipes
- Hair brush and supplies
- Lip Balm
- Bug Spray (we did not bring this and didn’t miss it)
- Camera/phone/electronics/chargers
Gear
Backpack – if you can, having a smaller sized backpack is nice on this hike since you don’t need to carry that much gear. You can complete this hike with just the use of a daypack that can hold between 20-40 liters. The three kids carried these Deuter Packs and I carried this pack.
See more about our favorite backpacks.
Poncho/pack cover – you will want something to keep the rain out of your stuff. A big poncho works great for this or you can line or cover you bag with a trash bag – not pretty, but does the trick!
First Aid Kit – we always carry a first aid kit on our travels and hikes. Make sure you have basics to cover blisters, pain killer for headaches, and a few items for more bigger injuries.
Hiking Poles – You don’t need hiking poles on this trek, but they are nice to have. We had 1 single hiking pole for the 5 of us and we took turns using it. It was nice to have on a few sections and if a dog got a bit too aggressive.
Headlamp – this is an essential item and is important for safety and useful at the hostels/hotels
Emergency Equipment – This is what we typically bring on a day hike with us and while it’s always good to be prepared, we didn’t bring all these items on this trek since we were never truly in the backcountry: duct tape, fire starter, whistle, and knife. We really
Food and Drink
Since you be eating breakfast and dinner along the hiking trail, you really only need food for lunch and snacks. For the first day, make sure you get a items at the grocery store right next to the bus stop in Latacunga or in one of the small stores once you get to Sigchos.
After the first day, you can usually buy a bag lunch from the hotel or hostel that they will pack for you to take along on the hike. This includes plenty of food for the entire day. Our bag lunch from Hostel Cloud Forest had a sandwich, chocolate, chips, drink and 4 pieces of fruit!
While you can buy bottled water, every place we stayed also had a a large jug of filtered water where you could fill your reusable water bottle. We each brought a 1 liter reusable water bottle and refilled it before leaving to hike each day. We also had one additional water bottle as a backup. This is the minimum you should take with you each day. We also drank a full water bottle once we arrived at the end of each day and in the morning to help with the altitude.
Budget and Insurance
Budget
Once of the best things about hiking the Quilotoa Loop is that the hike can be done on a small budget, unlike similar hikes where you need to have a guide. It really is one of the cheapest treks around the world. If you are looking to do this trek as cheaply as possible, you can stay for most nights around $20 including a full dinner and breakfast. Plan to spend a few additional dollars on lunch/snacks and a few dollars to take the bus to and from Quilotoa and it’s completely possible to do this 3 day trek for under $100. A budget of about $35 dollars/day is reasonable.
On the other hand, you can also spend more money if you want to do additional activities or stay at some of the more expensive hotels along the way. Even if you decide to splurge, this trip is still inexpensive and you should budget about $100/day. This lets you enjoy a hot tub after hiking and a glass of wine with dinner!
Insurance
Anytime you travel, travel insurance can give you piece of mind and also help with emergency situations. Some travel credit cards come with some insurance, or you can purchase additional insurance for the duration of the trip. Read the details carefully and some insurance covered cancellations, emergency medical situations and more, while some only cover emergencies under certain situations.
Safety on the Trail
In general, the Quilotoa Loop Hike is a safe hiking trail, but normal caution should be used for hiking and traveling. We found the people along the way to be very friendly and helpful and never felt in danger from any humans. This area is mostly remote and people are busy going about their daily work of farming. We saw many solo hikers including women on the trail.
We also found the hiking trails to be mostly well maintained with easy footing, although we are used to hiking in the rocky and challenging White Mountains of New Hampshire. As usual, it’s best to have basic first aid skills when hiking over long distances. Below are a few extra safety measures you should keep in mind:
Sunscreen: Even if it is cloudy, make sure to wear enough sunscreen. We forgot one day and our faces and necks got fried – if you are sensitive, it’s best to wear a hat as well.
Altitude: Altitude can cause challenges when hiking – make sure to give yourself extra hiking time and drink plenty of water. If you are suffering from more several altitude symptoms, it’s best to descend.
Dogs: One of the biggest concerns we saw before hiking was that there were aggressive dogs along the hiking route. We saw plenty of dogs along the hike, and had no issues. The biggest problem was that a dog tried to follow us for a few miles. Some locals tried to help lure the sweet little dog back to its town just so it didn’t get lost.
The dogs that did bark as us were usually from a distance and were defending their farm or property. If a dog got too close, simply reaching down and pretending to pick up a rock usually sent the dog scurrying in the other direction. We heard that if a dog is truly aggressive throwing a rock not at them, but towards them can help. We also felt better carrying a hiking pole.
Cell Phones: be prepared and embrace very limited cell coverage along this route. We have wifi at most of the hotels we stayed at, but we were prepared to be off the electronic grid for the full 3 days on your trip.
Description of Hiking the Ecuador Quilotoa Loop
In this section we will describe in detail how to complete the Quilotoa Loop hike. Please note that there are multiple ways to do this hike and depending on the conditions and your own preferences you can change up the trails. We will share how we hiked the route following the directions from the hostels, the maps available and the signage. While the trail is fairly well marked with signs it is pretty easy to get a bit off trail, but don’t worry there is always another road or trail to take to get you where you plan to go.
Hiking from Sigchos to Isinlivi
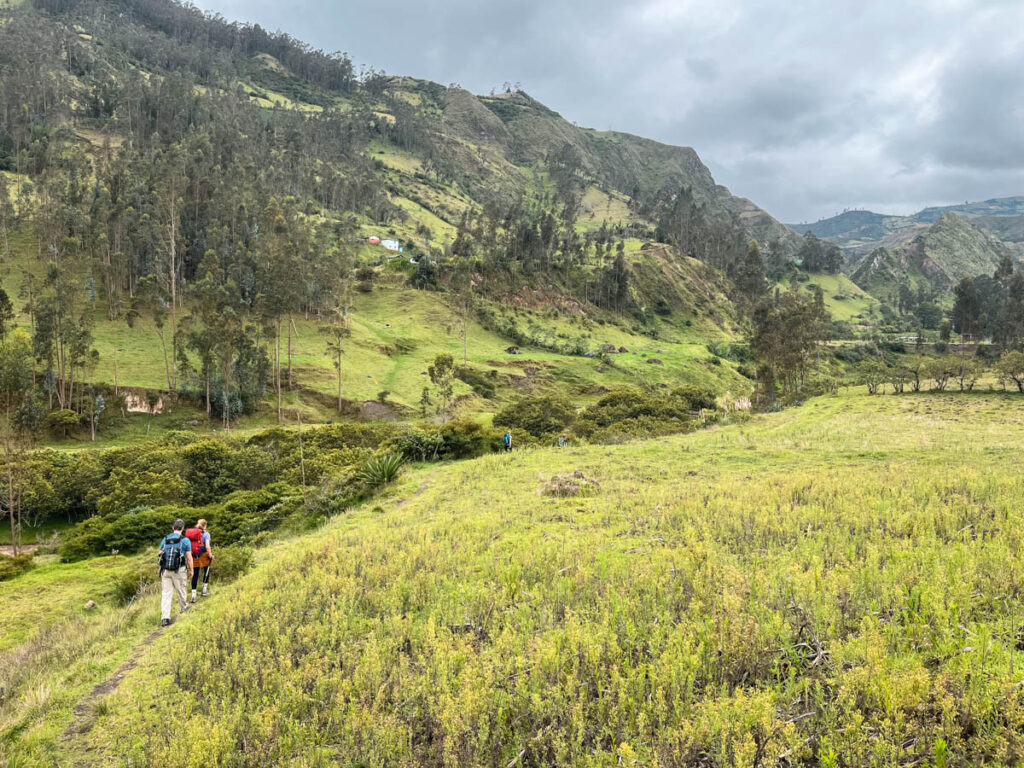
This is a beautiful hike that follows both roads and trails through some truly gorgeous farmland. The first few hours are flat or gradually descend. After crossing the river, the trail ascends steeply to the road that leads to Isinlivi. Follow the red and yellow signs to find the trail throughout the day. This is the easiest hiking day and will take 3-5 hour total hiking time. Even though it is the easiest, there is still a steep section.
After arriving at the bus station, head southeast through town. You will eventually end up on a road that leads out from town and you will see a sign for the Quilotoa Loop. Sigchos is not a very big town and if you are at all confused, simply ask someone and they will point you on your way.
Start the hike by walking downhill on the dirt road, pass the church. The road turns to the left and you can follow the sign here onto a shortcut trail between two farm. After just a few minutes, you will see another trail break. The main trail looks like it goes straight here, but follow signs and turn to the left. This trail descends steeply down the hillside for a short time until it ends at a dirt road. Turn right onto the road and continue steadily downhill.
The road will soon take a U-turn – turn onto the trail here and continue downhill until you again reach a dirt road – turn right onto the road and you will come to a large concrete bridge. Do not cross the bridge. Just uphill before you get to the bridge turn right onto a dirt path. Follow this easy dirt path for about 2 km.
Look for a sign on your left after a small farm that descends downhill to the river. There is a small bridge here to cross the river.
After crossing the river, follow the path (it was a bit muddy here) turn to the left and go up the short hill. You will reach a road here – follow the road to the left and then right at the split – this will begin taking you up the far side of the valley towards Isinlivi. After just a few minutes, take the marked trail to the left. This is the steep climb for the day and the trail follows the hillside through more farmland and a gate (make sure to close the gate behind you). Stay on this trail for the entire uphill climb. You will go back and forth through many switchbacks until finally reaching the main road into Isinlivi. From here the walk is easy but it will take about 30 minutes to walk into town.

The town of Isinlivi is small and you will be able to easily find your lodging for the night. If you are staying at Llullu Llama, take your fight right in town and you will see the orange building ahead of you.
Hiking from Isinlivi to Chugchilan
Just like the first day, you will begin today’s hike with a long decent into the valley before ascending back up the other side to Chugchilan. This day has the most variation and options for different routes and should take about 4-6 hours to complete.
Start your hiking by walking downhill out of the village after enjoying a great breakfast no matter where you are staying. If you are staying at Llullu Llama, walk down the trail past the kitchen and join the dirt road as it goes downhill.

After leaving the houses of the town behind you, turn left onto a marked trail and descend downhill for about 1/3 of a mile. You will join back with a road and see a concrete bridge in front of you. Cross the bridge and continue on the road until you see a trail on the right going slightly uphill. Turn onto this trail and it will become a dirt road.
Stay on this road for a couple km. This is really more of a trail than a road and it gets quite small and washed out in several places. The trail here is not hard, but is the most uneven of the entire hike. You will pass white cliffs. Go through the white cliffs and you will see a small white house ahead of you. Turn right onto the trail another left on the trail. We made the mistake of missing this left and ended up at a dead end at the river and had to retrace our steps.


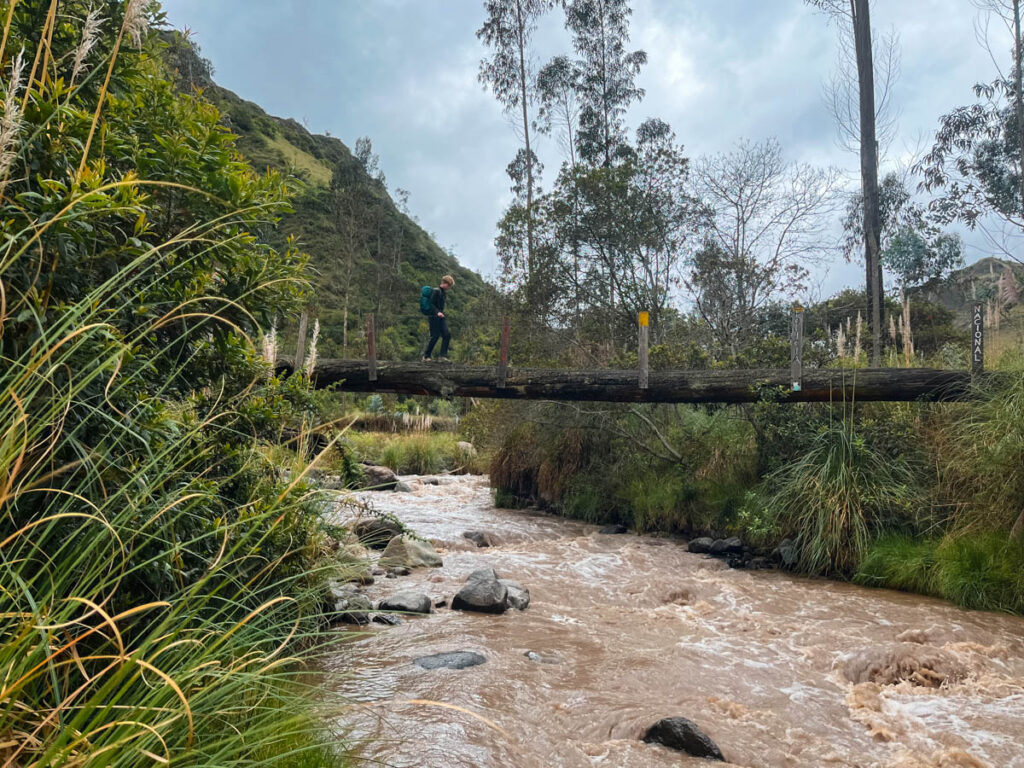
Pass through several gates – the trail through this section become low and you will cross through field and wet areas. After reading a boulder, you will see a log bridge that crosses the river (Rio Toachi). After crossing the bridge, turn left onto the large road and follow the river – you will eventually see a suspension bridge on your left – don’t cross this bridge and continue on the road until you reach the small town of Itualo with a small yellow church in the center.

At this point you have another choice. You will see signs pointing uphill from here saying ‘safe trail’ If you choose to take this trail, you will ascend the steep slope directly above the town and then traverse to Chugchilan along the top. About half of the people we talked to took this route.
We decided to keep hiking along the road. This route is incredibly beautiful but also has some exposure and drop offs. We loved this trail, but if it was raining or you have a fear of heights I would choose the other trail.
Walking along the road you will see a bridge – before you get to the bridge, take the trail to the right and begin ascending uphill. This is the climb for the day and you will ascend steadily uphill. After reaching the top of the climb, the trail continues mostly flat through a very pretty and narrow valley before the final ascent to the road. There are a few small turns here, but keep following the well marked signs for Chugchilan.
At the road, turn left and walk a short distance into the town of Chugchilan. We stayed at the Hostel Cloud Forest which is one of the first building you come to in town.

Chugchilan to Quilotoa
Your final day of hiking from Chugchilan to Quilotoa should take between 4-6 hours and is the hardest day on hiking on the Quilotoa Hike – mostly because you reach the highest elevation when you get to Quilotoa Lagoon.
Start your hike by going up into the town of Chugchilan. At the central plaza in town, take the main road and turn left at the library. Follow this road for about 1/3 mile. You will get to a junction – turn left and go downhill. You will quickly descend downhill towards La Moya and Quilotoa for about 2 miles.


Eventually you will come to a curve in the road to the left and there will be a trail in front of you. You can take either the trail or the road. We chose to take the trail that goes straight and then ascends steeply up a sandy slope. Both options lead to the small town on La Moya.
Follow the road straight ahead through the town passing a sports field on your left – turn on the path just after this following the signs – you will come through the rest of the village and see a trail junction. From here you have two options – descend downhill and up the other side, or turn right and follow the hillside.

We chose to turn right and followed the trail along a nice, if slightly exposed hillside that eventually descends down to the very small stream crossing and a waterfall. Climb the short hill on the other side, past the gazebo and turn left on the road to the town of Guayama Grande. Follow the signs to Quilotoa onto the trail. At this point the trail begins to ascend steadily towards the crater rim passing a few houses along the way.
This is a pretty hike, but is also the hardest climb of the day. The trail gets progressively steeper as you climb and passes a gate – shortly after this turn right. Continue making your way uphill through a pine forest. There is a road that does some large switchbacks up this hill and you can either walk the road or walk straight uphill on the trail. This area of the hike is very open, so it is pretty obvious where you are going.
After this steep climbing you will reach the rim of the Quilotoa Crater. Give yourself a pat on the back, but remember you aren’t quite done yet. There is a nice little tea/snack shack right here where you can take a break or continue on your way.
To finish the hike to Quilotoa, you have two options. If you have time and energy – turn left and hike about the longer part of the rim – this will take another 2-4 hours. Otherwise you will turn right here and make your way counterclockwise around the crater rim.

It may be tempting to take the lower path that goes along the inside of the crater, but the better choice is to climb up. The path roughly follows the rim of the crater ascending and descending and eventually meeting up with the rim. The path is not hard but after 3 days of hiking we were tired on this stretch. Eventually you will see the town of Quilotoa. Complete your hike, give yourself a high five and walk to the center of town to look for the bus.

Common Question About the Quilotoa Loop Hike
Below you can find some common questions about hiking the Quilotoa Loop in Ecuador. If you have other questions not covered in the information above, leave a comment and I will continue to update this post.
Is the Quilotoa Loop hard?
Yes – the Quilotoa Loop is hard but if you are in decent shape and give yourself some time to acclimate, it is a reasonable hike for more people. If you have never hiked before, this is probably not the best hike to start with. If you are a hiker but have never done an overnight, this is a great first option as you are only carrying a typical day pack.
Is the Quilotoa Loop Hike worth it?
If you’re wondering why you Should Hike the Quilotoa Loop, the quick answer is that it is a gorgeous hike with views of the Andes, Ecuadorian farmland and of course the beautiful Quilotoa Loop. The hike is considered safe and is well appointed with places to stay along the way.
Which route is Best for Quilotoa Loop?
The best route is to hike to Quilotoa Crater over 3 days starting in Sigchos. This is the most challenging direction, but is most popular as you end your hike at the crater lake.
When Should I hike the Quilotoa Loop?
You can hike the Quilotoa Loop any time of year, but the best time of year is during the dry season between June-Sept. Mornings are generally dryer with less clouds so try to hike early in the day and get to your hotel by mid-afternoon to avoid hiking in the rain.
How do you get to the Quilotoa loop?
The best way to get to the start of the Quilotoa Loop is to take a bus from Latacunga to Sigchos. Buses run several times a day and this is a comfortable and easy way to travel.
What towns are in the Quilotoa loop?
The Quilotoa hiking route typically refers to hiking between the towns of Sigchos, Isinlivi, Chugchilan and Quilotoa. The Quilotoa Loop also refers to a drive that starts in Latacunga and goes to several of these towns in a loop.
Other Incredible Destination in Ecuador
Explore the Amazon in Ecuador
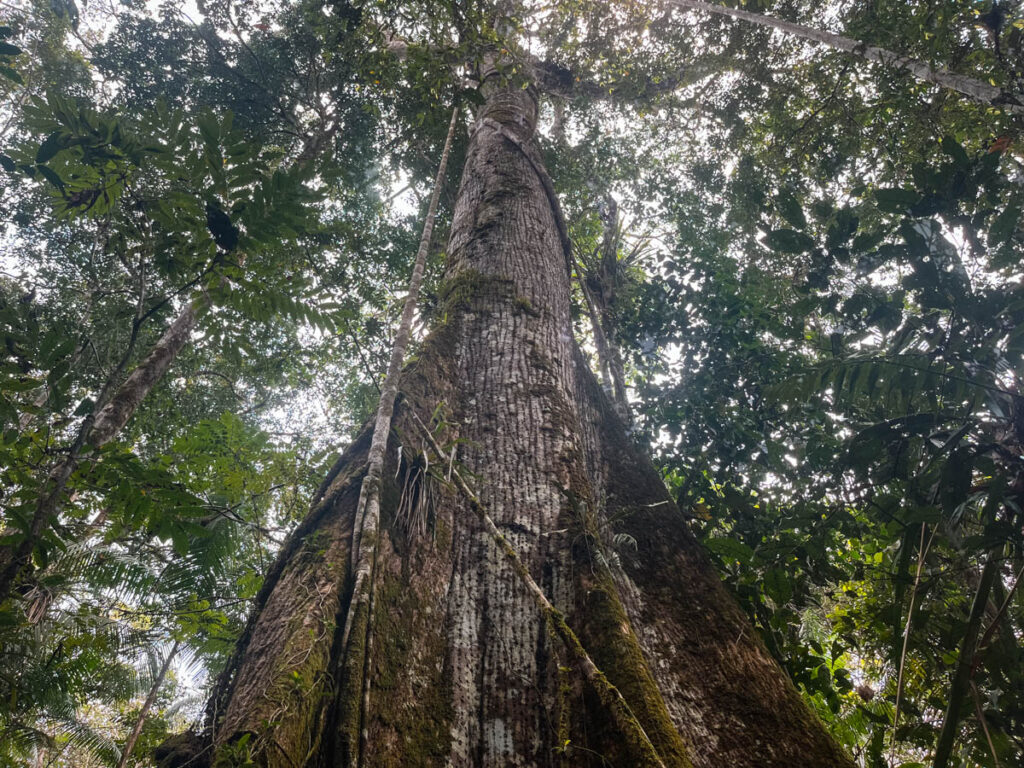
Covering much of the eastern part of Ecuador, the Amazon rainforest is a must-visit destination in Ecuador. Join a multi-day tour, or book a stay in an Amazon eco-lodge.

Soak in Hot Springs in Papallacta
Just one hour outside of Quito, this lovely hot springs resort offers many hot pools to soak in and relax.

10 day Ecuador Itinerary
Explore the Andes and Amazon on this 10 day itinerary full of adventure. You can find everything you need to book your own trip to Ecuador.