
Composition is the best thing to focus on if you want to take better photos. Of course all the tricks of using your phone are important, but if you have bad composition, you won’t like your photos. The same rules of good photography apply to both iPhone and DSLR photos. Implementing these techniques alone will improve your travel photos.
Want more tips on taking better travel photos?
- Composition Techniques for Stunning Travel Photos
- Why Your Smart Phone is the Best Travel Camera
- Travel Photography Courses
- How to Take Better Travel Photos
- Exploring Light in Travel Photography
- Editing on Your Phone Like a Pro
- Types of Travel Photography
- How to Overcome Common Travel Photography Challenges
It’s Time to Level up Your Travel Photography
Want to improve your travel photography? I’ve create two resources to help you get started! Check out my brand new Phone Travel Photography book (available in print AND as an ebook) or try my travel photography course (this is included when you join my newsletter as a paid subscriber or you can purchase through the link below).


The Rule of Thirds & Leading Lines
The Rule of Thirds: Creating Balanced & Dynamic Images
One of the simplest yet most effective composition rules is the Rule of Thirds. Imagine dividing your image into nine equal parts using two horizontal and two vertical lines. In the last chapter we added gridlines to our camera. You can use these lines to visualize your horizon and subject line. The idea is to place key elements of your photo along these lines or at their intersections to create a visually balanced composition.
🔹 Why it Works:
- Keeps your subject from being dead-center, making the image feel more natural.
- Helps guide the viewer’s eye across the frame.
- Creates a sense of movement and space within the photo.
🔹 How to Apply It:
- Place your horizon line along the top or bottom third rather than in the middle. A horizon line that cuts across the center of your photo is unpleasant.
- Position subjects (people, buildings, or objects) at one of the four intersection points instead of the center.
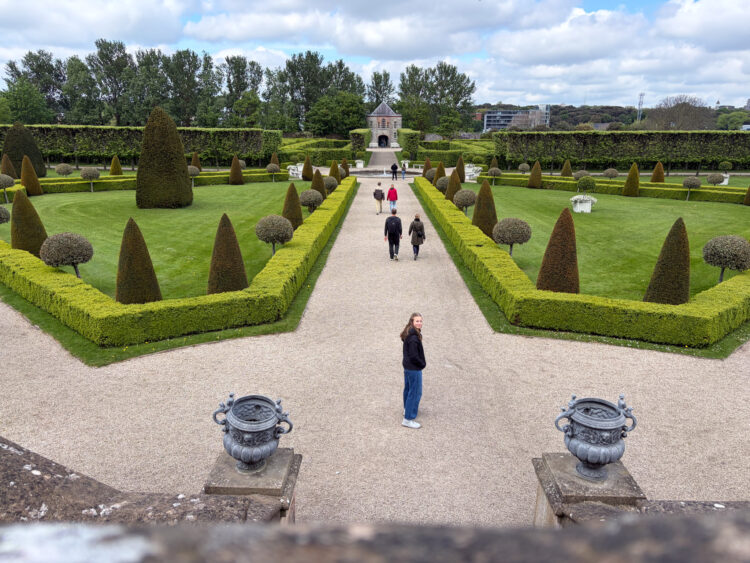
Pro Tip: Instead of centering a lighthouse in your frame, position it on the left third of the image while capturing the ocean on the right. If you have a person in the image, it’s best that they are walking or looking towards the center of the photo instead of off to the side. This helps to draw your eye towards the photo.
I’ve spent decades exploring family adventures, epic hikes, and National Parks across the world. For more inspiration, check out my National Parks Page or see some of my favorite destinations to plan your next adventure and make sure to join my weekly newsletter.


Leading Lines: Guiding the Viewer’s Eye
Leading lines naturally draw the viewer’s eye toward the main subject of the photo, making the image more engaging and dynamic. These lines can be roads, fences, rivers, or even shadows.
Use leading lines to add interest to your photos.
🔹 Where to Find Leading Lines:
- Roads & Paths – A winding road leading to a mountain.
- Bridges & Railways – Train tracks disappearing into the distance.
- Shorelines & Rivers – A river leading the eye toward a castle.
- Buildings & Architecture – Hallways or staircases framing a person.
Pro Tip: When photographing a city street, position yourself so that the lines of the road or buildings naturally lead toward a landmark in the distance.
You don’t need a bulky DSLR to capture stunning travel photos—your phone is more powerful than you think. This course is designed specifically for adventurers who want to take pro-quality photos on the go without the hassle of extra gear. Whether you're hiking remote trails or exploring vibrant city streets, you'll learn how to harness natural light, compose eye-catching shots, and edit like a pro—all using your smartphone. By the end, you'll have the skills and confidence to build a travel photo portfolio that truly reflects your adventures.

Get my Full Course.

Framing & Perspective: How to Tell a Story with Your Photos
Framing: Using Natural Elements to Enhance Your Image
Framing is a technique where you use objects in the foreground to “frame” your subject, adding depth and focus to your shot. This can create a sense of place and add layers to your composition.
🔹 Where to Find Natural Frames:
- Doors & Windows – Looking out from an ancient archway toward a cathedral.
- Tree Branches & Leaves – Using overhanging branches to add texture.
- Bridges & Fences – Shooting through railings or archways.
ProTip: If you’re capturing the Eiffel Tower, try shooting through the ironwork of a nearby bridge to create an interesting layered effect.

Perspective: Changing Your Angle for More Impactful Photos
The angle you shoot from dramatically changes the mood and storytelling of your photo. By moving beyond eye level, you can create more intriguing and unique images. Some of my favorite photos were taken from a different perspective. Be creating, get low, stand up high and experiment with different perspectives.
🔹 Ways to Play with Perspective:
- Low-Angle Shots – Make buildings and monuments look towering and majestic. This gives you a child perspective and makes you seem superior.
- High-Angle Shots – Great for capturing crowds, markets, or patterns in a landscape. If you are taking high angle shots of a person, it can make them look small in an impressive landscape.
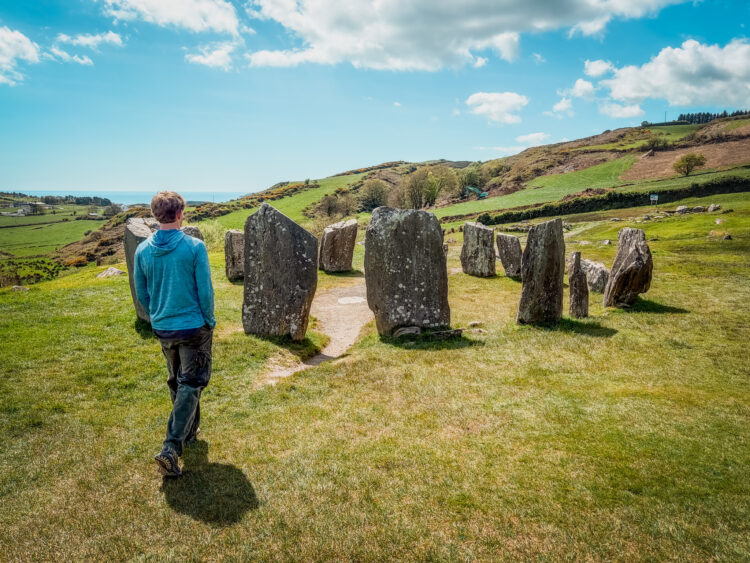
- Over-the-Shoulder Shots or Point of View Shot – Adds a storytelling element by showing what someone is looking at. This create realism.
- Lateral Movement – This refers to how the object or lines are set up. Are you taking the photo straight on or coming from an angle. This can be interesting with a person in the shot as the person might not be looking at the camera but off to the side.
Pro Tip: Instead of taking a straight-on shot of a gondola in Venice, shoot from the side at water level to immerse the viewer in the experience.

Capturing Movement & Action Shots
Why Movement Matters in Travel Photography
Travel photography isn’t just about still landscapes; it’s about capturing the energy and life of a destination. Whether it’s a bustling market, a street performer, your kids on a hike, or waves crashing against the shore, movement can bring your photos to life.
Techniques for Capturing Movement:
- Freeze the Action: Use a fast shutter speed (or burst mode) to capture sharp, detailed action shots.
- Motion Blur: Use a slightly slower shutter speed to show the blur of movement (e.g., waterfalls, cars, or dancers). You will need to use a 3rd party app to change the shutter speed.
- Panning: Follow a moving subject (like a cyclist) while keeping them in focus and blurring the background.
Best iPhone Features for Action Shots:
- Burst Mode: Swipe the shutter button to the left to take multiple images quickly. Great for fast-moving subjects.
- Live Photos: Capture a few seconds of movement and later choose the best frame.
- Slow Shutter Apps: Apps like Slow Shutter Cam allow you to create long exposure shots for light trails or waterfalls.
Pro Tip: Capture a street musician in action by using burst mode or take a panning shot of a tuk-tuk speeding through Bangkok’s streets.

Creative Angles & Unique Perspectives
Breaking Away from Standard Shots
The best travel photos often come from thinking outside the box and capturing subjects from unexpected angles. Experimenting with your shooting position can transform an ordinary scene into something extraordinary.
🔹 Ideas for Unique Perspectives:
- Shoot from the Ground: Get low to emphasize texture in cobblestone streets or reflections in puddles.
- Use Reflections: Capture mirror-like images in lakes, sunglasses, or glass windows.
- Overhead Shots: Hold your camera high above a crowd or flat-lay food photography.
Using Shadows & Silhouettes for Artistic Effects
Shadows and silhouettes can create mystery, contrast, and drama in your shots.
- Silhouettes: Place your subject against a bright background, like a sunset, and expose for the sky.
- Dramatic Shadows: Shoot in strong sunlight to capture long, geometric shadows.
📸 Example: Instead of taking a regular sunset shot, capture a silhouette of a camel caravan against the desert sky.
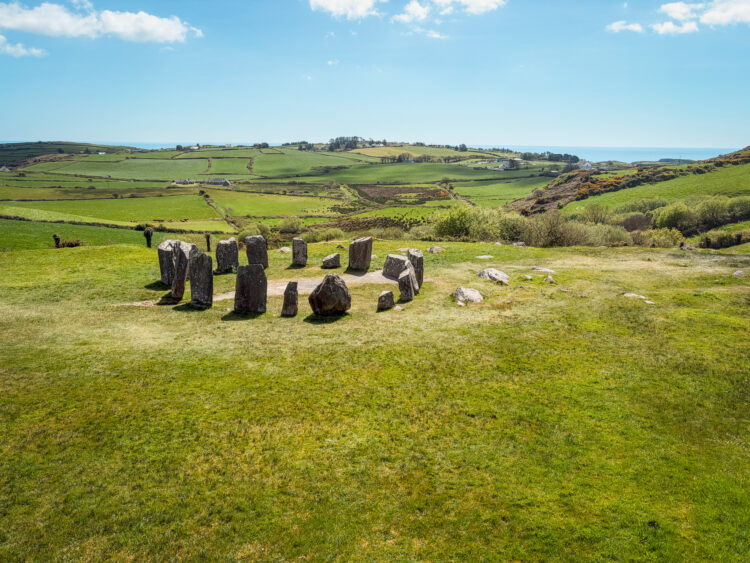
Creating Depth in your Photos
A photo naturally portrays a relationship between you (the viewer) and the subject. Giving a sense of depth in the photo builds this feeling. To create depth, you can add foreground or simply include the ground that leads to the object. This can help place a person into the landscape or create a sense of moving towards a distant object.